What payments are actually used for in Listdom
Many users first meet payments through the Membership add-on, but Listdom’s payment logic is broader than that.
Depending on your add-ons and business model, the payment system can power:
- package purchases for memberships
- claim fees when users claim listings
- label purchases such as Featured or Verified
- top up purchases to boost listings
- booking-related charges when your booking setup requires payment
- recurring billing when your package model depends on subscriptions
That means your payment engine is not just a checkout tool. It becomes part of the monetization layer of the site.
If you want a broader strategy view before choosing the payment engine, see How to Monetize a Directory Listing Website with WordPress Using Listdom, because that article helps place payments inside the bigger monetization picture.
The two payment paths in Listdom
Listdom supports two main payment paths:
1. WooCommerce
This path uses WooCommerce as the checkout and order system.
In practice, this means:
- you create WooCommerce products
- Listdom features connect to those products
- the user goes through WooCommerce checkout
- successful orders unlock the related right, feature, or purchase effect
This is a strong option when:
- your site already uses WooCommerce
- you want the wider WooCommerce ecosystem
- you want to rely on WooCommerce payment gateways
- you may need WooCommerce-based subscription tools for recurring billing
2. Listdom Payments
This is the native Listdom payment engine.
In practice, this means:
- you configure payment settings directly in Listdom
- you create payment plans inside the Listdom Payments area
- those plans can be attached to Listdom monetization features
- orders, coupons, and recurring payment behavior stay inside the Listdom side of the site
This is a strong option when:
- you want a lighter setup without WooCommerce overhead
- your site is mainly a directory, not a store
- you want native payment plans for Listdom-specific monetization features
- you want a cleaner setup focused on directory workflows
When native payments are enabled, Listdom adds a dedicated Payments area in the admin menu where you manage plans, coupons, orders, and recurring payments. Native recurring payments are part of the Pro-level payment path, so users planning subscription-style billing should account for that in the product choice. If you later decide WooCommerce is the better fit, you can switch between WooCommerce and the native engine from the Payments settings.
Which option is better for your site?
A practical way to decide is this:
Use WooCommerce if:
- you already run a WooCommerce-based site
- you want the store ecosystem
- you already use WooCommerce checkout, products, and payment plugins
- you want recurring billing through WooCommerce subscription tools
Use Listdom Payments if:
- your site is mainly a directory, not an online store
- you want simpler native monetization
- you want payments managed directly inside Listdom
- you prefer not to add WooCommerce unless you really need it
For many new directory owners, Listdom Payments is the cleaner starting point.
For sites already built around WooCommerce, WooCommerce is often the more natural choice.
Step by step: how to set up payments in Listdom
Before setting up any specific monetization method, start with the payment engine itself.
Go to:
Listdom → Settings → Payments
This is where you choose whether the site uses:
- WooCommerce
- or Listdom Payments
After that choice, the rest of the setup should follow the same logic throughout the site.
Step by step: how to set up WooCommerce payments in Listdom
This is the better path when WooCommerce is already part of your site plan.
Step 1: Install and configure WooCommerce
Make sure WooCommerce is installed, activated, and has at least one working payment gateway.
Do not wait until the end to test checkout. A monetization flow is only as good as the payment step behind it.
Step 2: Select WooCommerce as the payment system
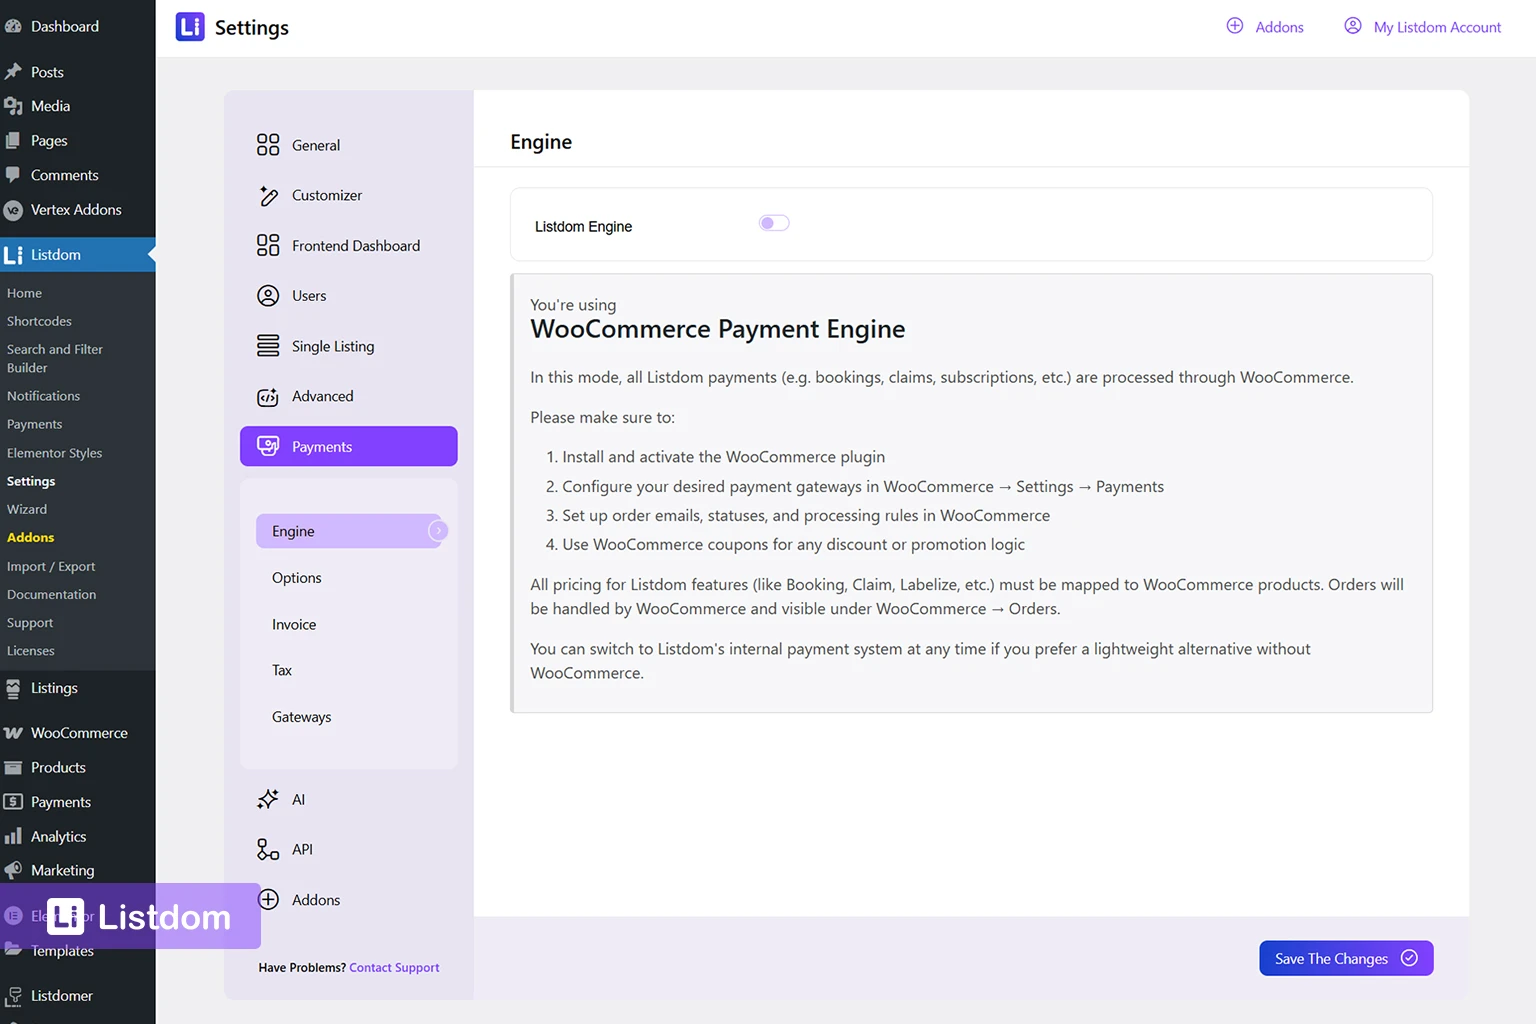
Go to:
Listdom → Settings → Payments
Disable the Listdom Engine, so WooCommerce will be used as the payment engine.
This tells Listdom to use WooCommerce products and checkout flow for supported monetization features.
Step 3: Create the WooCommerce product you need
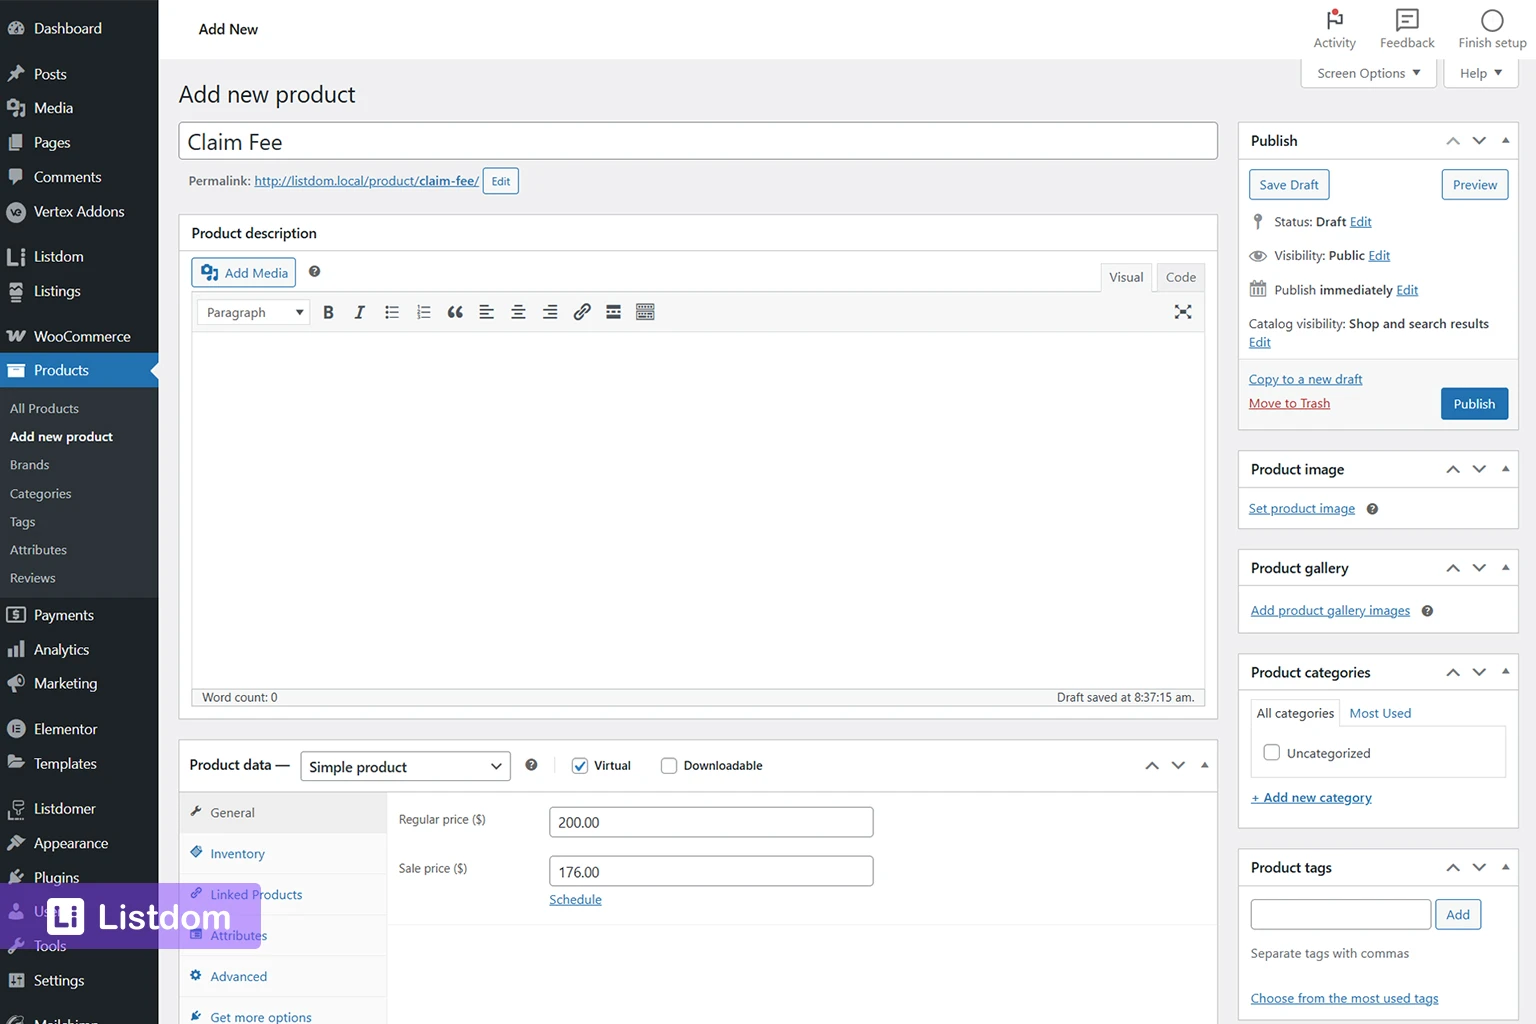
In WooCommerce, create a product that matches the monetization action.
Examples:
- one product for a membership package
- one product for a claim fee
- one product for a top up purchase
- one product for a paid label like Featured
- one product for a booking-related payment when needed
A good practical rule is:
one monetized action or package should have a clear matching WooCommerce product
This keeps the setup easier to understand later.
Step 4: Link the product to the Listdom feature
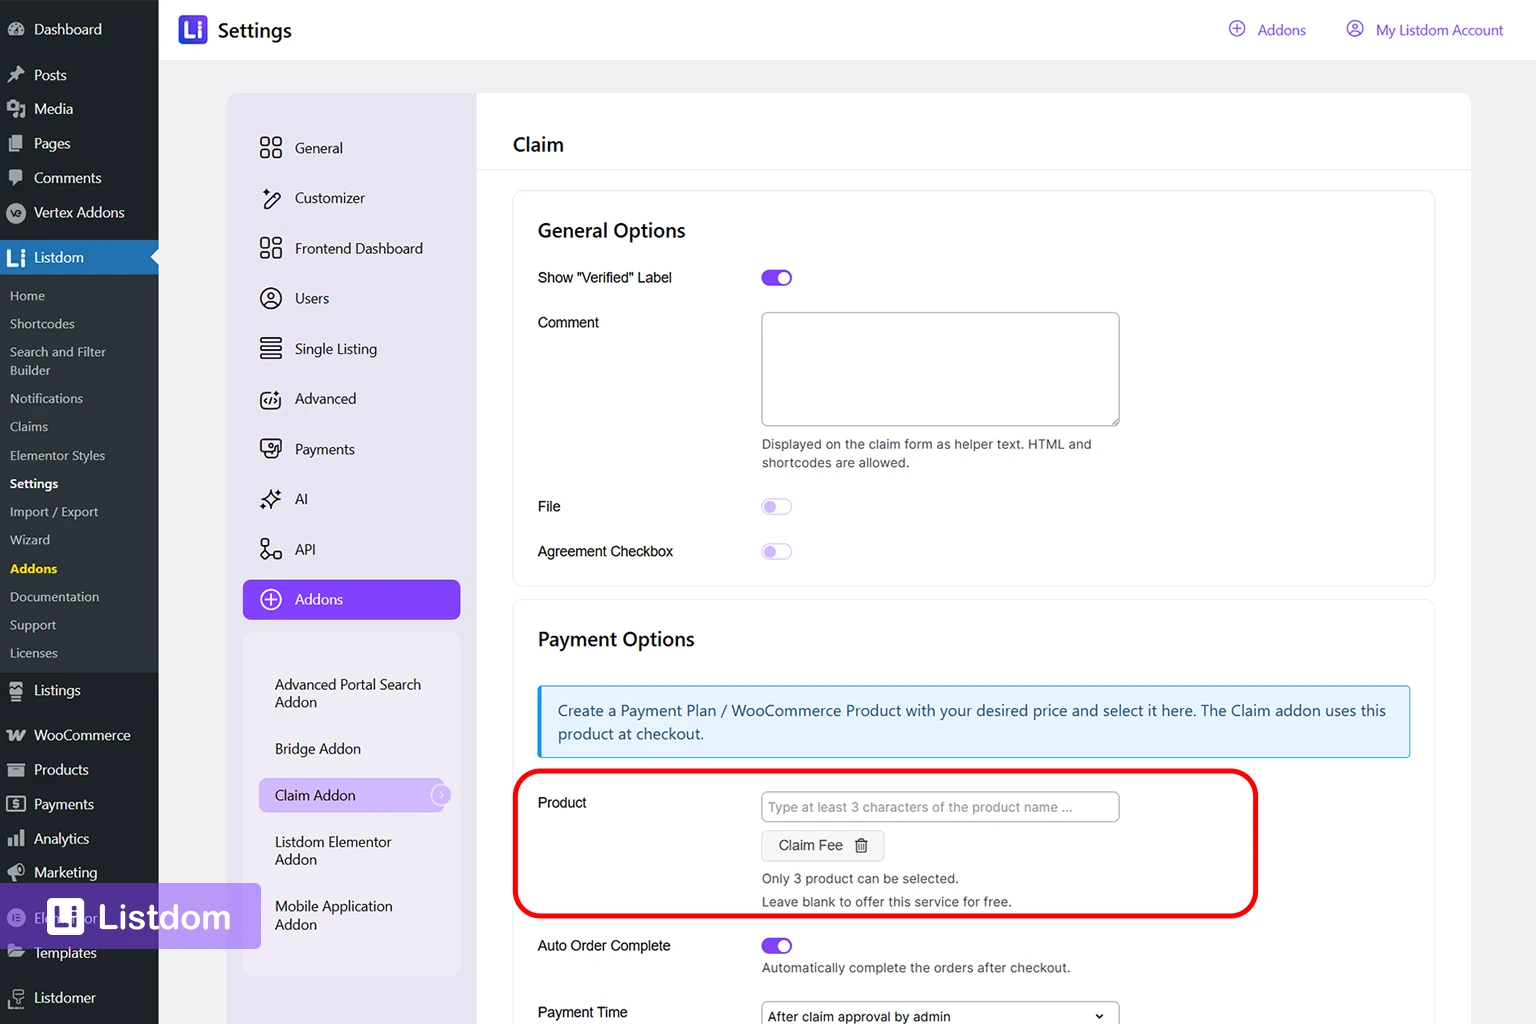
This depends on the add-on you are using.
For example:
- Membership packages should be linked to their WooCommerce product in the membership setup
- Claim fees should be linked in Listdom → Settings → Addons → Claim
- Label purchases should be linked in the relevant label setup
- Top up purchases should be linked in Listdom → Settings → Addons → Top Up
- Booking-related payments should be linked in the booking setup when payment is part of the booking flow
In other words, WooCommerce handles checkout, but the feature itself is still configured in its own Listdom area.
Step 5: Test the full user journey
Do not stop after linking the product.
Test the real flow with a normal user account:
- click the real button
- go to checkout
- complete the order
- confirm that the related right or feature is applied correctly
This is especially important for claim fees, labels, top ups, and bookings, because they are easy to set up partially and assume they are done.
Step by step: how to set up Listdom Payments
This is usually the cleaner option when you want native payment handling.
Step 1: Choose Listdom Payments as the payment system
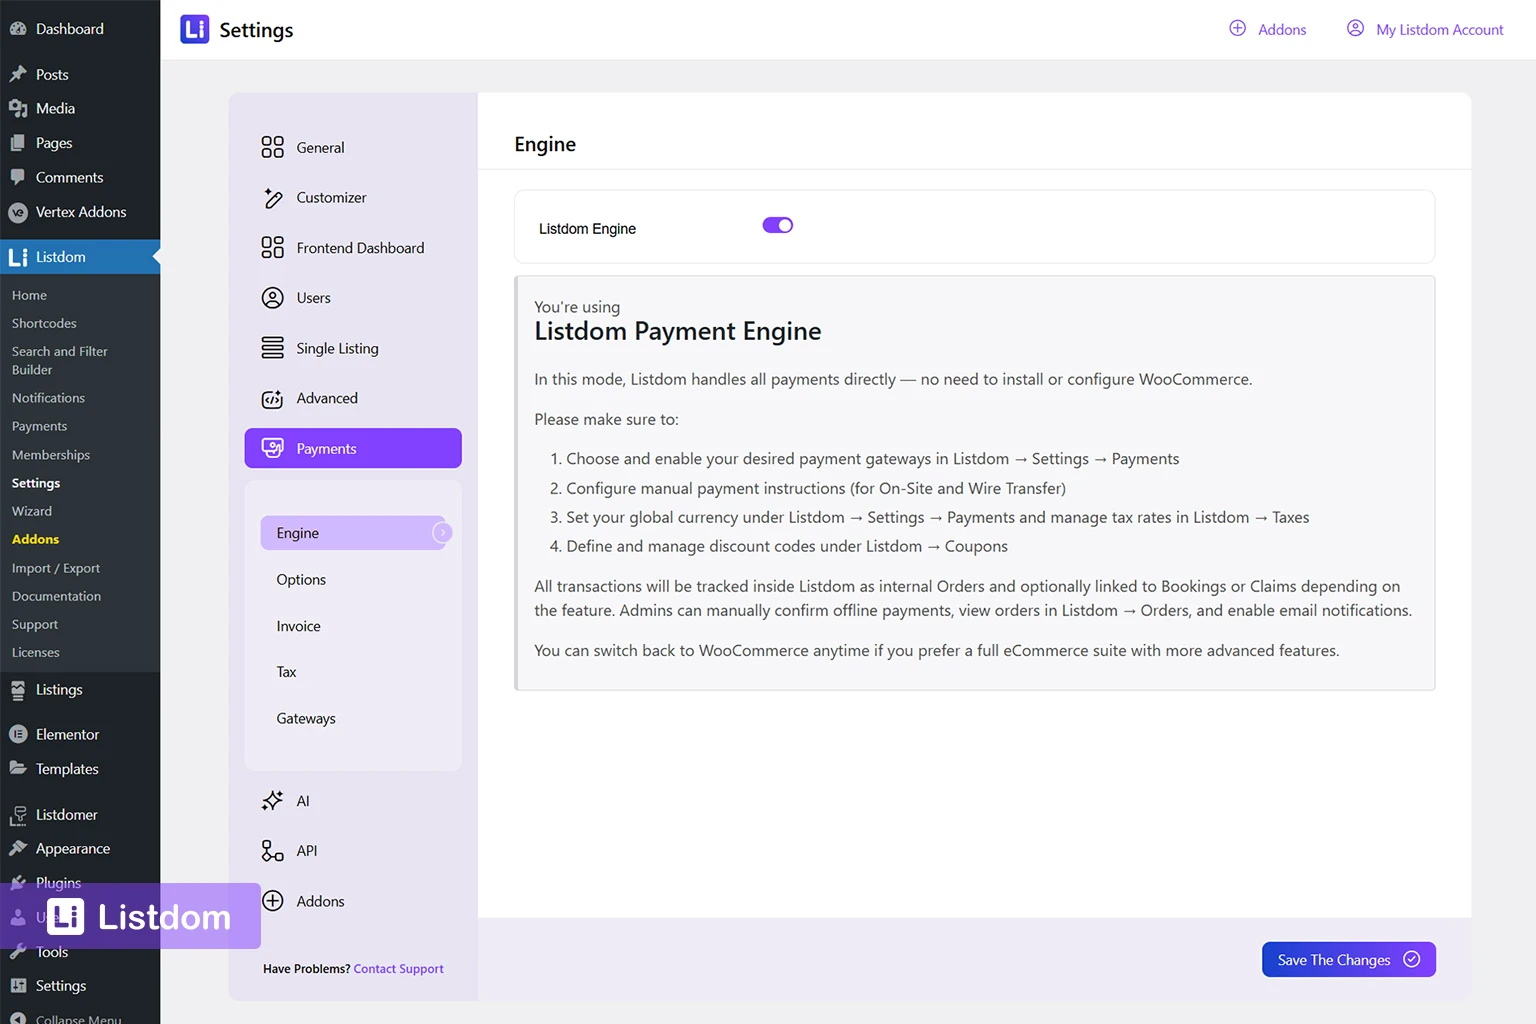
Go to:
Listdom → Settings → Payments
Choose Listdom Payments.
This enables the native payment workflow in Listdom.
Step 2: Configure the payment gateway
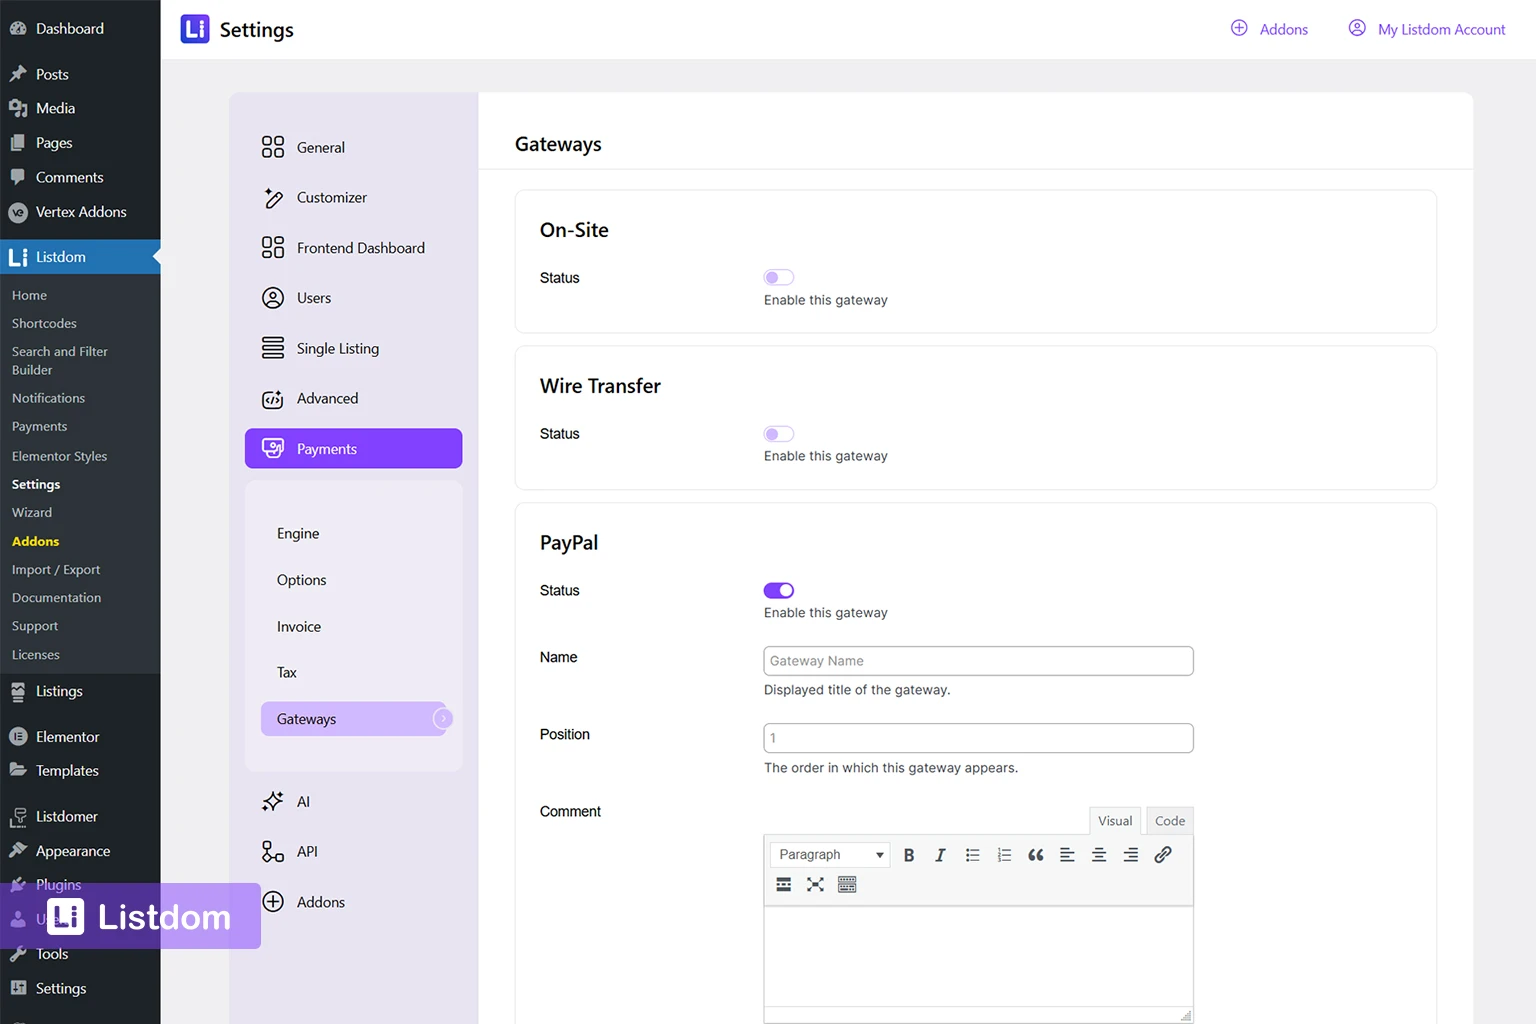
Still in the payments settings, configure the gateway or gateways you want to use.
This part matters a lot for the real user experience, especially if you plan to use recurring billing later.
Step 3: Open the Payments area in Listdom
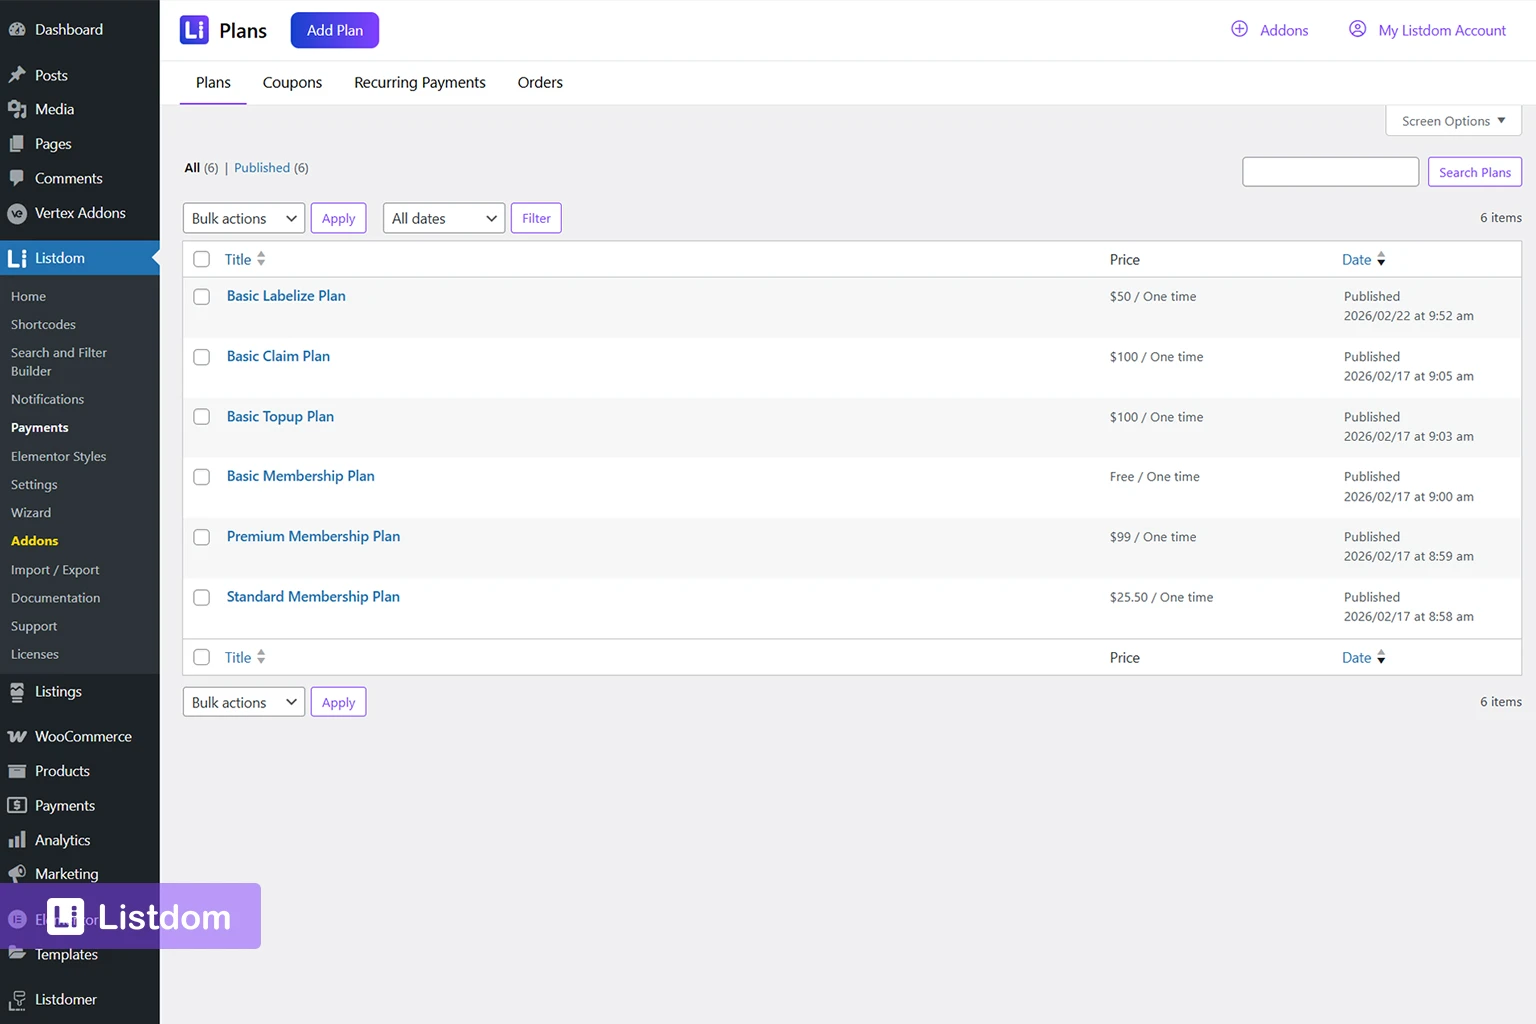
Once native payments are enabled, Listdom adds a dedicated payment area where you can manage:
- payment plans
- coupons
- orders
- recurring payments
This is where the payment side becomes operational.
A useful practical mindset is this:
- Settings → Payments decides which engine the site uses
- Listdom → Payments is where you operate the native payment system after you choose it
Step 4: Create the plan you need
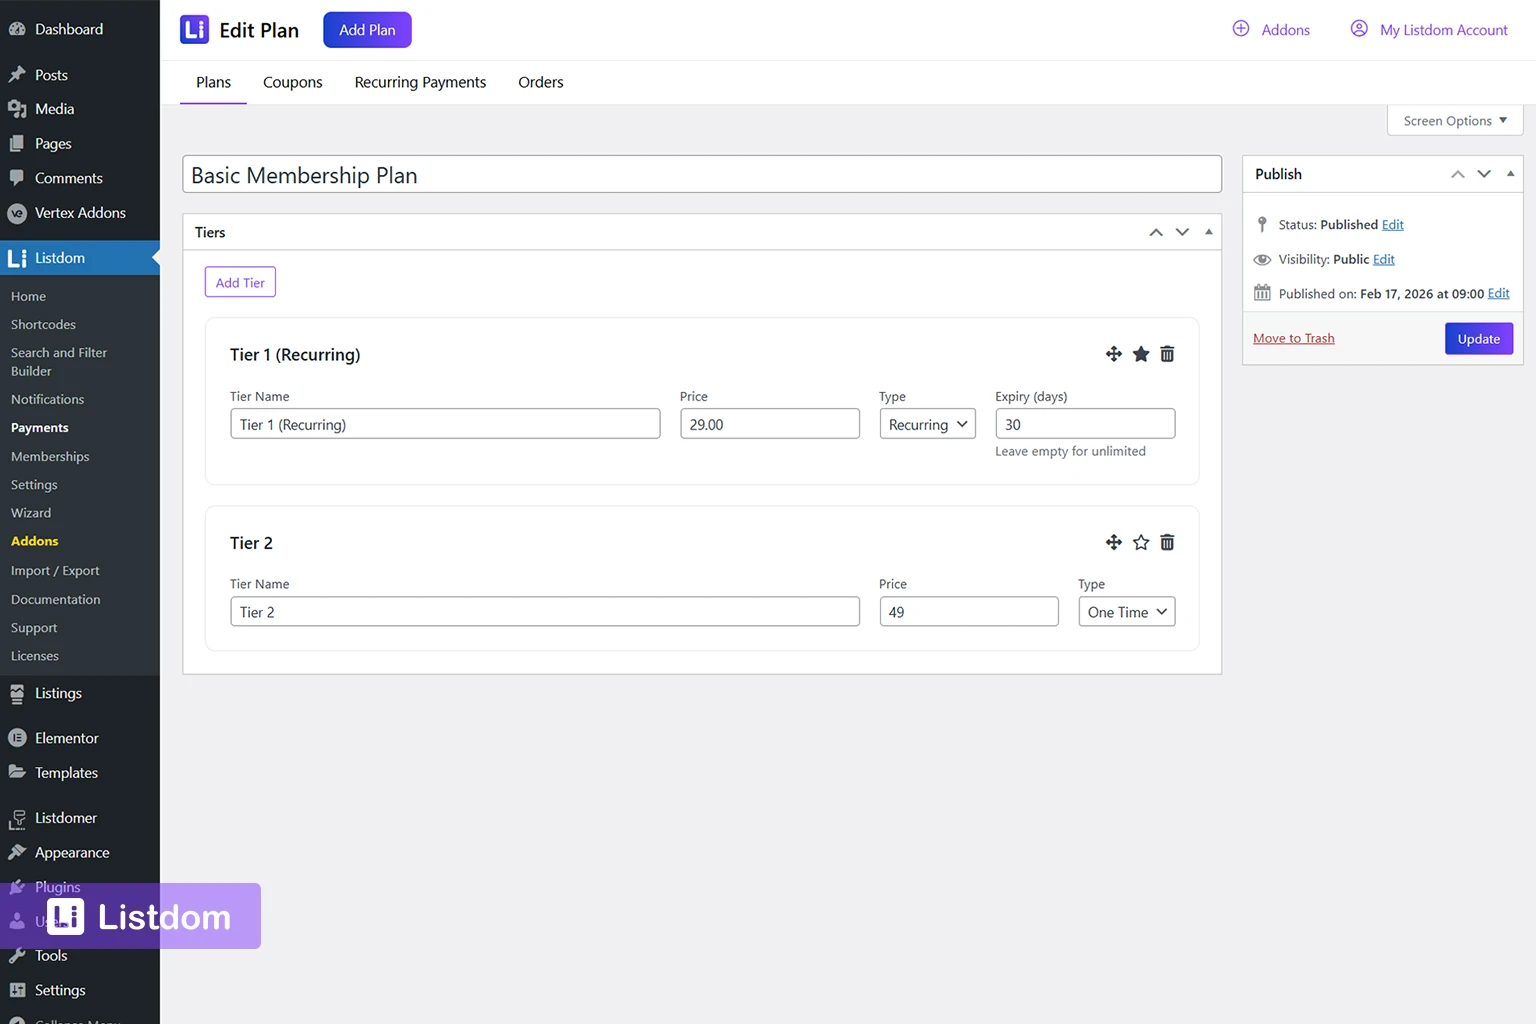
Create one or more payment plans that match the monetization method.
Examples:
- a plan for a membership package
- a plan for a claim fee
- a plan for a top up purchase
- a plan for label purchases
- a plan for a booking-related charge when needed
Plans can be created as one-time or recurring, depending on the model.
Step 5: Link the plan to the related Listdom feature
Just like WooCommerce products, Listdom payment plans are not useful until they are attached to the actual monetization feature.
Examples:
- membership packages use payment plans in the membership logic
- claim uses payment plans in the claim settings
- labelize uses plans for paid labels
- top up can use Listdom payment plans for boost purchases
- bookings can use native payment plans when the booking flow is configured for payment
Step 6: Test the real flow
Again, do not stop at setup.
Use a normal user account and test:
- the payment page
- order completion
- post-payment behavior
- whether the related listing right is applied properly
How to create better WooCommerce products for Listdom
A good WooCommerce product for Listdom monetization should be simple and clear.
Practical advice:
- use clear names like Featured Label, Business Package, Listing Claim Fee, Listing Top Up, or Booking Fee
- keep the product purpose obvious
- avoid overloading one WooCommerce product for multiple unrelated actions
- if recurring billing is needed, use the correct WooCommerce subscription model rather than trying to fake it with a normal product
This matters because users should understand what they are buying from the product name alone.
How to create better plans in Listdom Payments
A payment plan in Listdom should also be practical, not abstract.
A good plan setup should answer:
- what is the user paying for?
- is it one-time or recurring?
- how long does it last?
- what right does it unlock?
Examples:
- Starter Monthly
- Business Yearly
- Claim Fee
- Featured Label
- Top Up Boost
- Booking Payment
This makes the payment side easier for both admins and users to understand.
How payments connect to different monetization methods
This is where many users need the most clarity.
Membership packages
Payments can be used to sell membership packages.
Depending on your setup, the package can be connected to:
- a WooCommerce product
- or a Listdom payment plan
The package controls listing rights. The product or payment plan controls billing.
If your real goal is package-based listing rights, see How Listdom Membership Packages Work because package setup and payment setup should be planned together.
Claim fees
The Claim add-on can use:
- a WooCommerce product
- or Listdom Payments
That means you can charge users when they claim a listing without forcing the entire site into one billing model.
A useful real-world detail is that claim payments can be taken either while the claim form is being sent or after the claim is approved, depending on your claim settings.
If claiming listings is one of your main monetization methods, also see How to Claim Business Listings in a Directory Website with Listdom, because it explains the ownership and claim journey that sits behind the payment step.
Label purchases
The Labelize add-on also supports both payment paths.
This is useful when you want to sell things like:
- Featured labels
- Verified labels
- highlighted presentation options
If labels are part of your monetization model, also see How to Use Featured Listing Labels and Badges to Monetize a Directory Website, because it explains when labels work best as a visibility or trust monetization method.
Top Up purchases
The Top Up add-on can also be connected to WooCommerce or the Listdom payment engine.
This is useful for directories that want users to pay for more visibility after a listing is already live.
If your real goal is priority placement rather than package sales, also see How to Create Featured Listings in a Directory Website with Listdom, because that article explains the business logic behind Top Up in user-facing language.
Booking-related payments
If your booking setup requires payment, the same engine decision matters there too.
That means your site can stay consistent instead of using one payment path for packages and another for bookings unless you intentionally want that complexity.
If booking monetization is part of your model, also see How to Monetize a Directory Listing Website with WordPress Using Listdom, which includes booking-based monetization in the broader strategy view.
Recurring payments: how they work
Recurring payments are an important decision, especially for package-based directories.
With Listdom Payments
Listdom’s native payment system supports recurring plans directly.
That means you can create:
- monthly plans
- yearly plans
- one-time lifetime plans
A key practical note is that recurring billing depends on gateway support. If your gateway does not support the recurring logic you need, the plan may not behave the way you expect.
With WooCommerce
WooCommerce recurring billing is usually handled through the WooCommerce side, using subscription-related tools or extensions.
This is often the better route if your whole site already depends on WooCommerce subscriptions.
When recurring makes sense
Recurring payments usually make sense when:
- listing rights should renew automatically
- your business model depends on ongoing revenue
- your package is really a subscription, not a one-time bundle
- your directory behaves more like a membership platform
When one-time payments make more sense
One-time payments are often better when:
- your site is still new
- you want the lowest-friction paid model
- you are testing pricing before introducing subscriptions
- the purchase is tied to a simple one-time action like a claim, top up, or label
If you are still deciding how packages and recurring billing fit together, see How Listdom Membership Packages Work because recurring plans usually make the most sense when the package model itself is already clear.
Common beginner mistakes
Assuming payments are only for membership packages
They are not. Claims, labels, top ups, bookings, and other monetization methods may use the same payment engine.
Choosing the heavier payment system without needing it
If your site is not store-like, WooCommerce may be more overhead than you need.
Choosing native payments without checking gateway support
This especially matters if recurring billing is part of your business model.
Creating products or plans without a clear matching user action
If the payment item is unclear, the whole journey becomes harder to understand.
Linking the product or plan incorrectly and never testing the full flow
This is one of the easiest ways to think the site is monetized when the user journey is still broken.
Treating payment setup separately from access flow
In real directories, payment, login, dashboard flow, and package rights often affect one another. If you need to think through that access layer, see How Listdom Login, Registration, and Access Flow Work.
What to configure first
A practical order looks like this:
- decide which payment engine fits your site: WooCommerce or Listdom Payments
- configure the payment gateway
- decide which monetization methods will use that engine
- create the products or payment plans
- connect them to the related Listdom feature
- test the complete journey with a normal user account
That order helps you avoid building half a payment flow.
What to learn next
Once the payment engine is clear, the most useful follow-up topics are:
- How Listdom Membership Packages Work
- How Listdom Login, Registration, and Access Flow Work
- How the Listdom Frontend Dashboard Works
- How to Monetize a Directory Listing Website with WordPress Using Listdom
These topics help connect billing setup to the actual user journey.
Final thoughts
The best payment setup is not the one with the most options.
It is the one that matches your site model and feels natural for the user.
If your site already lives inside WooCommerce, use that strength.
If your site is mainly a directory and you want a lighter native setup, Listdom Payments may be the better answer.
The key is to choose one system deliberately, connect it clearly to the monetization methods you actually use, and test the full flow before launch.
FAQ
Is Listdom Payments only for membership packages?
No. It can also be used for other monetization methods like claims, labels, top ups, and bookings when relevant to the setup.
Should I use WooCommerce or Listdom Payments?
Use WooCommerce if your site already depends on the WooCommerce ecosystem. Use Listdom Payments if you want a lighter native payment setup focused on directory monetization.
How do I create a payment plan in Listdom?
After enabling Listdom Payments, go to the Payments area in Listdom and create the plan there, then attach it to the related monetization feature.
How do I create a WooCommerce product for Listdom monetization?
Create a clear WooCommerce product for the specific action or package, then link it in the relevant Listdom add-on or membership setup.
Can I use recurring billing in both systems?
Yes, but the implementation differs. Listdom Payments supports recurring plans natively, while WooCommerce usually handles recurring billing through its own subscription tools.
Can the same payment engine power claims, labels, and top ups?
Yes. That is one of the most important things to understand when planning a broader monetization strategy in Listdom.