This onboarding guide explains the correct order of setup, how listings and taxonomies work together, how Listdom dummy data differs from full theme demos, and how to safely publish your first directory page without breaking anything. This is a more dedicated article to Listdom. You can click to find a more general guide about creating a directory site with WordPress.
This is not a replacement for technical documentation. Instead, it provides a clear mental model of how Listdom works so you can move forward with confidence.
By the end of this guide, you will understand how to:
- Install and activate Listdom properly
- Import dummy data or a full demo correctly
- Configure essential settings
- Create taxonomies and your first listing
- Display listings using shortcodes
- Set up a search form and a frontend dashboard
- Avoid common beginner mistakes
What Listdom Actually Does
Before configuring options, it helps to understand what Listdom is responsible for.
Listdom controls:
- Listing data and custom fields
- Categories, locations, labels, and tags
- Directory layouts and skins
- Search and filter behavior
- Frontend submission workflows
- Single listings styles and appearance
Your active WordPress theme, including Listdomer if you use it, controls:
- Global design such as headers and footers
- Typography and spacing in general pages
- Overall site styling
Even when using the Listdomer theme, the core directory logic remains inside Listdom.
The Core Mental Model of How Listdom Works
Many beginners feel confused after installing Listdom because the plugin introduces several concepts at once: listings, taxonomies, shortcodes, pages, search forms, and dashboards. The easiest way to understand Listdom is to learn the core connection between its main components.
A directory page in Listdom is built using the following chain:
Listings → Shortcode → Page → Search Form → Results
Understanding this flow makes everything else much easier.
Listings (Your Directory Data)
Listings are the core content of your directory website. Each listing represents an item in your directory, such as a business, property, event, service, or location.
Listings contain structured information such as:
- Title and description
- Images and gallery
- Address and coordinates
- Categories and locations
- Labels, tags, and features
- Custom fields
You create listings inside:
WordPress Dashboard → Listings → Add New
At this stage, the listings exist in your database, and each one is visible individually, but they are not visible as a list anywhere on your website yet.
Shortcodes (The Directory Layout Builder)
Listdom uses shortcodes to generate directory layouts. A shortcode defines how listings should be displayed.
You can create shortcodes from:
Listdom → Shortcodes → Add New
When creating a shortcode you choose:
- The skin (Grid, List, Half Map, Table, Carousel, etc.)
- Listing card style
- Sorting rules
- Pagination
- Map behavior
Think of a shortcode as a directory layout template.
It tells Listdom:
“Display these listings using this design.”
However, even after creating a shortcode, listings are still not visible until the shortcode is placed on a page.
Pages (Where the Directory Appears)
WordPress pages are where shortcodes are placed so visitors can see your directory.
For example, you might create pages such as:
- All Listings
- Restaurants Directory
- Real Estate Listings
Inside the page editor, you simply paste the shortcode generated by Listdom.
Example:
[listdom id="123"]Once the page is published, your listings will appear on the frontend using the layout defined in the shortcode.
Search Forms (Filtering the Directory)
Search forms allow visitors to filter and discover listings more easily.
You create search forms inside:
Listdom → Search and Filter Builder
A search form can include fields such as:
- Text search
- Category selector
- Location selector
- Features or tags
The search form does not display listings by itself. Instead, it filters the results of a listings shortcode.
This means the search form and the shortcode work together.
Results (Filtered Listings)
When a visitor uses the search form, the query filters the listings displayed by the shortcode.
The results can appear:
- On the same page
- Or on a dedicated results page
In both cases, the results are still rendered using a Listdom shortcode layout.
Visual Example of the Flow
To summarize the workflow:
- You create listings (directory content).
- You create a shortcode (directory layout).
- You place the shortcode on a page.
- You optionally add a search form.
- Visitors search and filter listings, and the shortcode displays the results.
Once you understand this structure, the rest of the plugin becomes much easier to use.
Before You Start
Before configuring anything inside Listdom, make sure the basics are ready:
- WordPress is installed and working properly.
- You have an active theme (any theme, or Listdomer if you want a demo).
- You have administrator access.
- If you plan to use maps, you are ready to generate API keys if required.
Decide early whether you want to:
- Import only dummy data and build layouts manually
- Or install the Listdomer theme and import a complete demo
Both approaches are valid. The difference is design convenience, not functionality.
End-to-End Setup Flow
If you want a simple checklist for how to use Listdom step by step, follow this order:
- Install and activate Listdom.
- Install and activate required add-ons.
- Optionally import dummy data or a Listdomer demo.
- Configure essential settings such as maps and security.
- Create base taxonomies like Categories and Locations.
- Add a few Listings with media and coordinates.
- Build a shortcode to display listings on a page.
- Create a Search form and publish a search page.
- Optionally enable the Frontend Dashboard for user submissions.
Now let’s walk through each stage properly.
Step 1: Installation and Activation of Listdom
Listdom is a WordPress plugin, so it must first be installed and activated from the WordPress admin area. Installing Listdom is straightforward. You can do it directly from your WordPress dashboard or manually by uploading the plugin file.
Here’s how to install Listdom from the WordPress repository:
- Go to your WordPress dashboard.
- Navigate to Plugins and click on Add New.
- In the search bar, type “Listdom.”
- Click Install Now.
- Once installed, click Activate.
To install Listdom manually:
- Download the plugin from the WordPress repository.
- Go to your WordPress dashboard.
- Navigate to Plugins and click on Add New.
- Click Upload Plugin.
- Choose the downloaded .zip file and click Install Now.
- Once installed, click Activate.
After activation, you will see two main areas in your dashboard:
- A “Listdom” menu
- A “Listings” menu
Nothing changes on the front end automatically unless you import dummy data or a theme demo.
If you plan to use additional features such as payments, frontend submissions, advanced layouts, or monetization tools, install and activate the relevant add-ons at this stage
Step 2: Import Dummy Data or Demo (Optional)
At this stage, you can decide whether to work from scratch or import sample content. Before you start building your directory, it is important to understand the difference between Listdom dummy data and Listdom full demo imports.
Listdom Dummy Data
Listdom provides sample dummy data that can be imported directly through the plugin.
You can import dummy data:
- Through the Listdom setup wizard (if available after activation)
- Or via the Import / Export section inside the Listdom menu
Dummy data usually includes:
- Sample listings
- Basic categories and locations
- Sample fields
This method works with any WordPress theme because it only imports content and structure. It does not change your site design.
Dummy data is ideal if you want to:
- Understand how listings are structured
- See how taxonomies connect
- Learn the plugin workflow without installing a specific theme
If you choose Listdom dummy data:
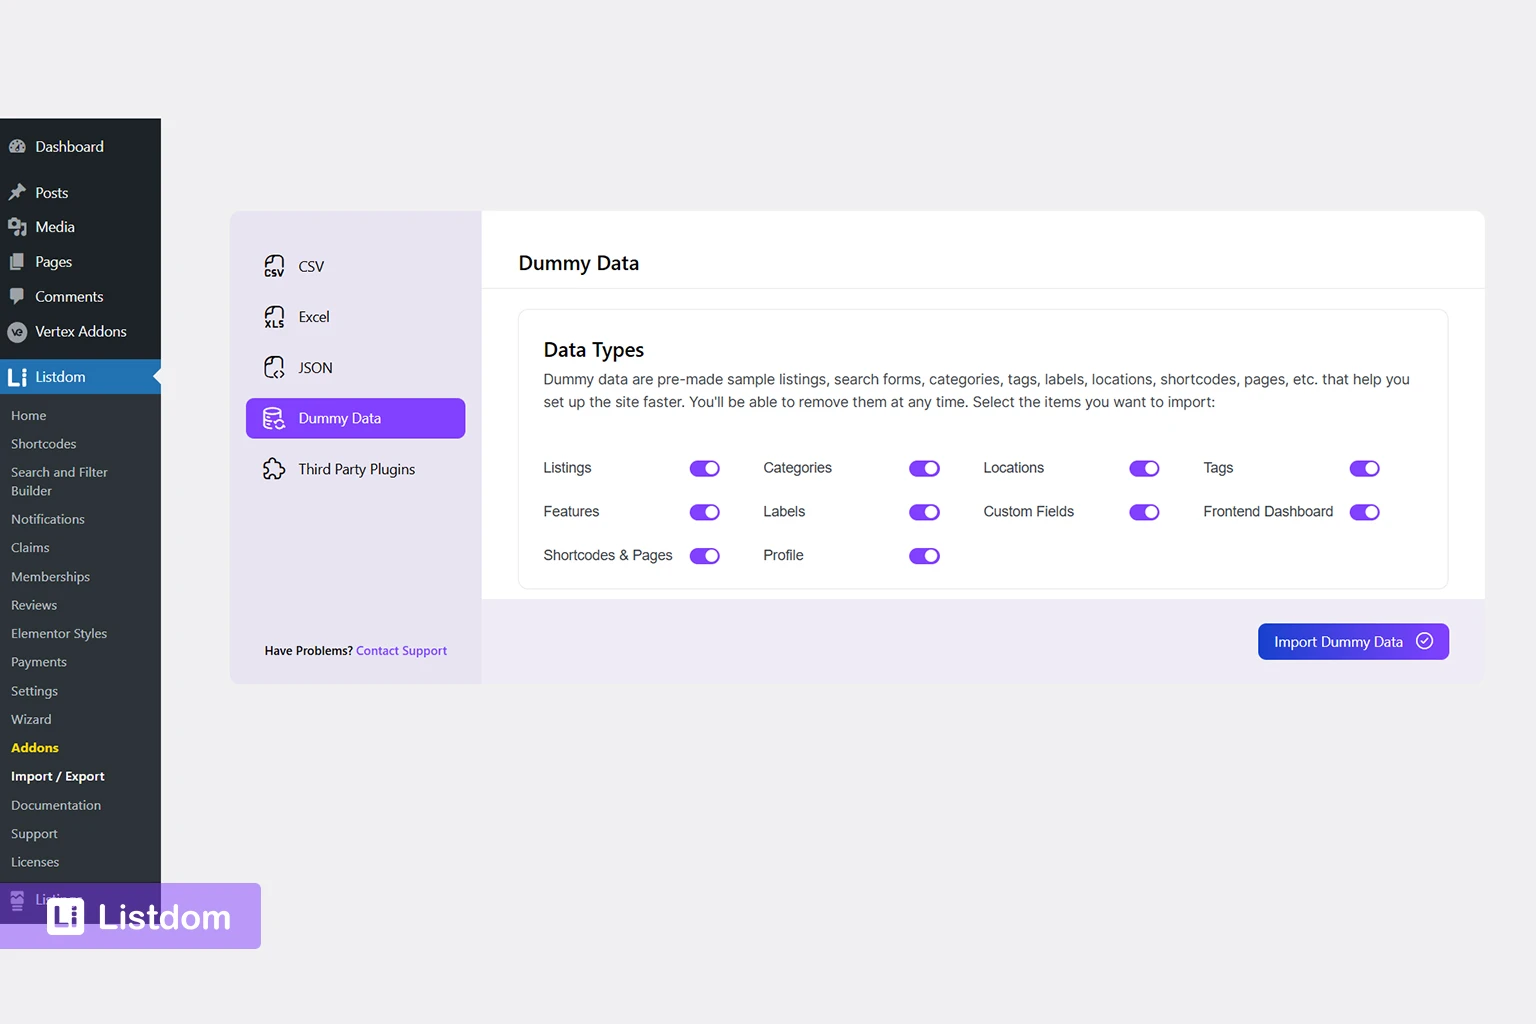
- Go to the Listdom → Import / Export → Dummy Data.
- Choose the types of data you want to import (listings, categories, locations, tags, etc.).
- Click the Import Dummy Data button.
Keep in mind that importing dummy data will add content to your website. So, consider backing up your site first. If you prefer, you can always start from scratch and add your own data. You can also run the Listdom Wizard in Listdom → Wizard and import the full dummy data.
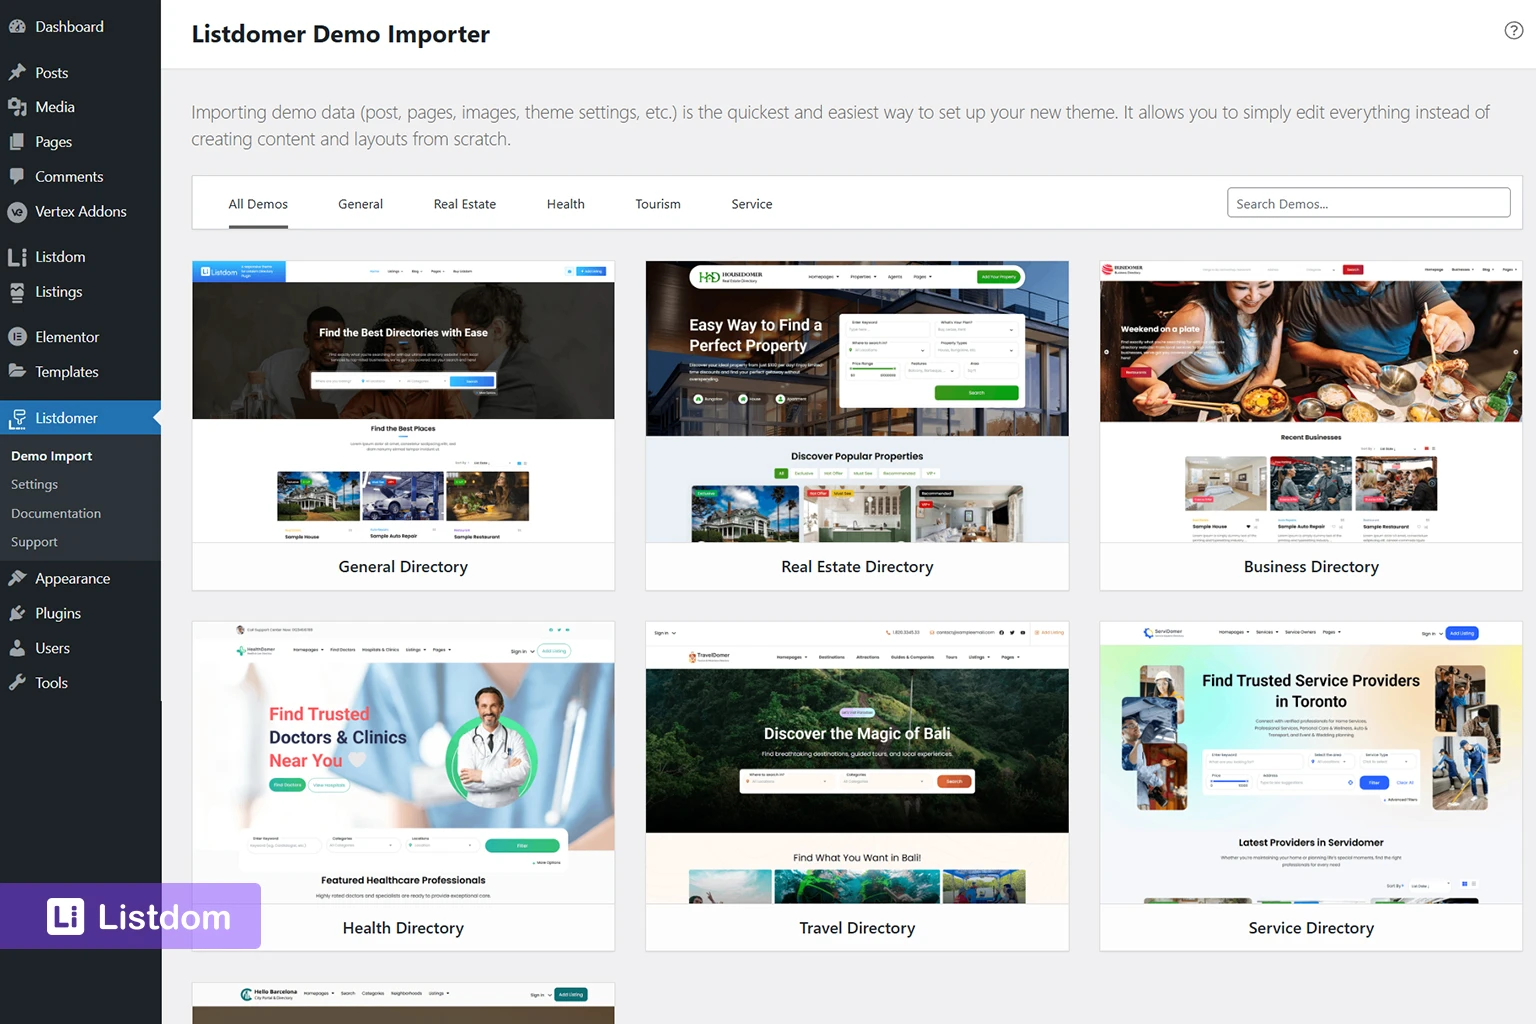
Listdomer Theme Demo Import
Full visual demos are imported using the Listdomer theme.
The Listdomer theme is a directory-focused WordPress theme built specifically to showcase Listdom with predefined layouts, Elementor headers and footers, and ready-made page templates.
When you import a Listdomer demo, you typically get:
- Complete page layouts
- Prebuilt archive and single listing templates
- Sample listings and taxonomies
- Preconfigured search forms
- Homepage sections and navigation structure
Demo imports are useful if you want a ready-made starting design instead of building pages manually.
Important points:
- Listdom works with any theme.
- The Listdomer theme is only required if you want the prebuilt demo layouts.
- You can switch themes later without losing listing data because listings live inside the Listdom plugin, not the theme.
Understanding this separation prevents confusion later.
If you choose a Listdomer demo:
- Install and activate the Listdomer theme
- Use the theme demo importer
- Select your preferred demo layout
Remember that demo content is replaceable. Study how pages, listings, and search forms are structured before editing heavily.
Step 3: Understanding the New WordPress Dashboard Menus
Before creating content, it is important to understand the Listdom admin menus and the separation between content and configuration.
The Listdom Menu
This area controls behavior and system configuration. Depending on your active add-ons, you may see sections related to:
- Settings
- Skin Shortcodes
- Search and filter settings
- Payments
- Notifications
- Add-ons
The Listings Menu
This is where your directory content lives. From here you can:
- Add new listings (Listings > Add New)
- Edit existing listings
- Manage Categories
- Manage Locations
- Manage Labels and Tags
- Configure custom fields
Think of this as the content engine of your directory website. Listings determine what users see. Settings determine how the system behaves.
Step 4: Configure Essential Settings
When you open the Listdom → Settings menu for the first time, you will see many options. New users often try to configure everything immediately, which can quickly become overwhelming. In reality, you only need to review a few key settings before creating your first listings.
Instead of exploring every tab, focus on the following essential areas.
Maps Configuration (Most Important)

If you want listings to display on a map or show location markers, you must configure the map provider.
To do this:
- Go to Listdom → Settings → General → Map Module.
- Choose the map provider.
If you choose Google Maps, to use it properly, you must enter a Google Maps API Key.
The API key allows your site to load maps, markers, and location data. Without it, maps will not appear correctly on listing pages or map-based layouts like the Half Map skin.
Once you generate your API key from Google Cloud Console, paste it into the API field inside the Maps settings and save.
reCAPTCHA and Security
If your directory allows frontend submissions or user registrations, it is recommended to enable Google reCAPTCHA to prevent spam.
You can configure this in:
Listdom → Settings → General → Google reCAPTCHA
Here, you can add the Site Key and Secret Key generated from the Google reCAPTCHA dashboard.
This step is optional at the beginning, but it becomes important once your site starts accepting public submissions.
General Plugin Behavior
Inside the General Settings section, you can review basic plugin behavior, such as:
- Permalink structure
- Some display preferences
For beginners, it is usually best to keep the default settings until your directory structure is fully working.
What You Can Ignore for Now
Many other settings are available in Listdom, including advanced integrations and add-on-related configurations. These are powerful features, but they are not required to launch your first directory page.
For now, the only critical configuration is:
- Map provider setup
Everything else can be adjusted later once your listings, pages, and search forms are working properly. Learn more about Listdom settings.
Step 5: Create Base Taxonomies
Taxonomies define how your directory is structured.
The most important taxonomies include:
- Categories
- Locations
- Labels
- Tags
- Custom Fields
Create your main structure before adding many listings. This prevents reorganization later. Let’s take a closer look at Listdom taxonomies, starting with categories.
- Navigate to Listings and click Categories.
- Click “Add New”
Creating a new category is simple:
- Insert the name and slug of the category. If you don’t specify a slug, it will default to the same as the name.
- Provide a description, icon, color, and image.
Using relevant icons and colors can help visually distinguish your categories.

The process for creating locations, tags, features, and labels is the same as creating categories. Just navigate to Listings and select the taxonomy you want to create.
Displaying Taxonomies on Listings
Taxonomies are displayed on listing cards and single listing pages. Labels and categories are typically shown on the listing cards, while features and tags can be found on the details page. All of these elements are clickable, leading to the archive of that specific item.
Displaying Taxonomies on Your Website: Elementor Add-on
If you’re using Elementor, the Listdom Elementor add-on includes widgets to showcase Listdom taxonomies in different styles.
Displaying Taxonomies on Your Website: Shortcodes
If you’re not using Elementor, you can use shortcodes to display taxonomies. There are shortcodes for categories, locations, and tags. For example, you can create a carousel for categories or showcase locations with images.
You can find all of the Listdom shortcodes in the Listdom documentation.
Step 6: Create Your First Listing
Ready to add your first listing?
- Navigate to Listings and click Add New Listing.
- Start by adding a title and description for your listing.
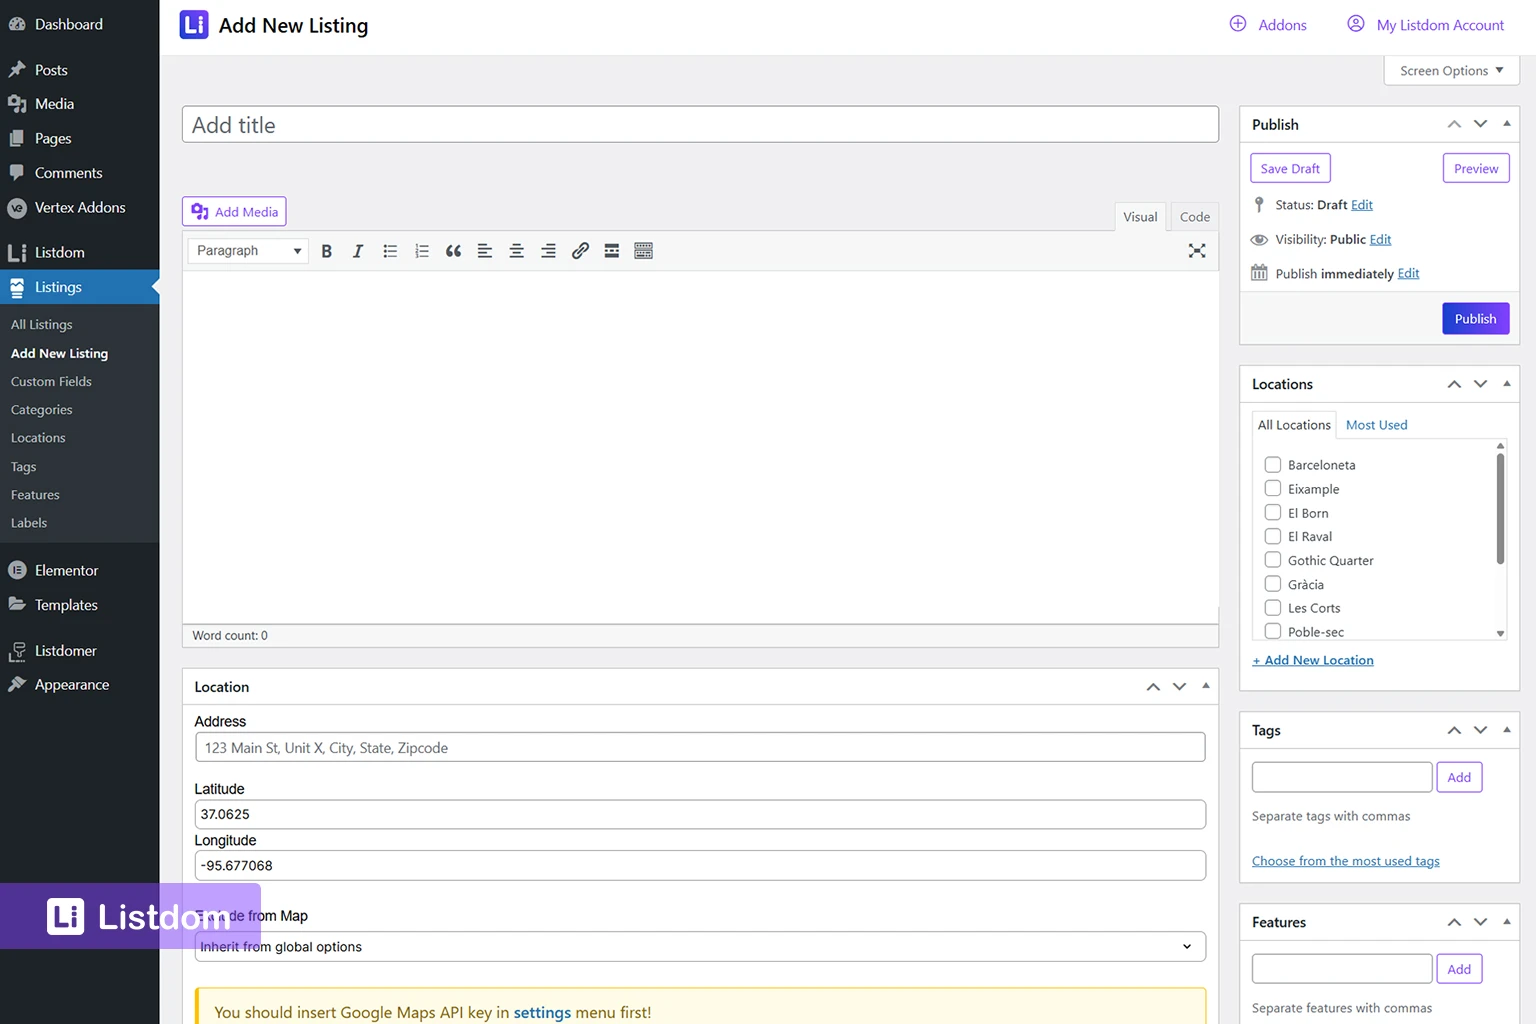
Now, let’s look at some important settings:
- Selecting Taxonomies: Assign your listing to a category (this is required). Add locations, tags, features, and labels as needed.
- Setting a Featured Image: Set a featured image to make your listing stand out.
- Location Settings: Add the listing address and latitude/longitude coordinates.
Price Options and Details
If you want to include pricing details for your listings, Listdom lets you specify the currency, price, and maximum price. You can also add a description like “per game,” “per month,” or “per night.” The “price class” feature lets you mark your listings as “cheap,” “normal,” “high,” or “ultra-high.” Imagine a real estate site using price classes to quickly show property value.
Setting Working Hours for Listings
For businesses or services, you can set the working hours for your listings. Specify the opening and closing times, and indicate if the listing is closed on certain days. You can also indicate if it’s closed on Sunday by checking that option. For example, you might set a store’s hours from 9:00 AM to 7:00 PM and indicate that it’s closed on Sundays. If you’re creating a listing for a store or business, it may operate 24 hours or from 7:00 p.m. to 3:00 a.m.
Contact Details and Custom Links
Include contact details for your listings, such as phone numbers and email addresses. The custom link feature lets you redirect users to an external website. Instead of showing the listing details on your site, users will be sent to the listing owner’s website. If you have a list of items and want to redirect users to the listing owner’s website instead of showing the listing details, you can insert the desired link. This is useful for referral links or other purposes.
Additional Listing Features
You can also add gallery images and excerpts to your listings. The more information you provide, the more attractive your listings will be! Learn more about creating a listing in Listdom.
Publishing the Listing
Once you’ve entered all the necessary data, publish the listing.
Step 7: Display Listings Using Shortcodes
After creating a few listings, the next step is displaying the listings on your website using Listdom skin shortcodes. Listdom does not automatically show listings on pages. Instead, it uses a powerful shortcode builder that lets you create different layouts and insert them anywhere on your site.
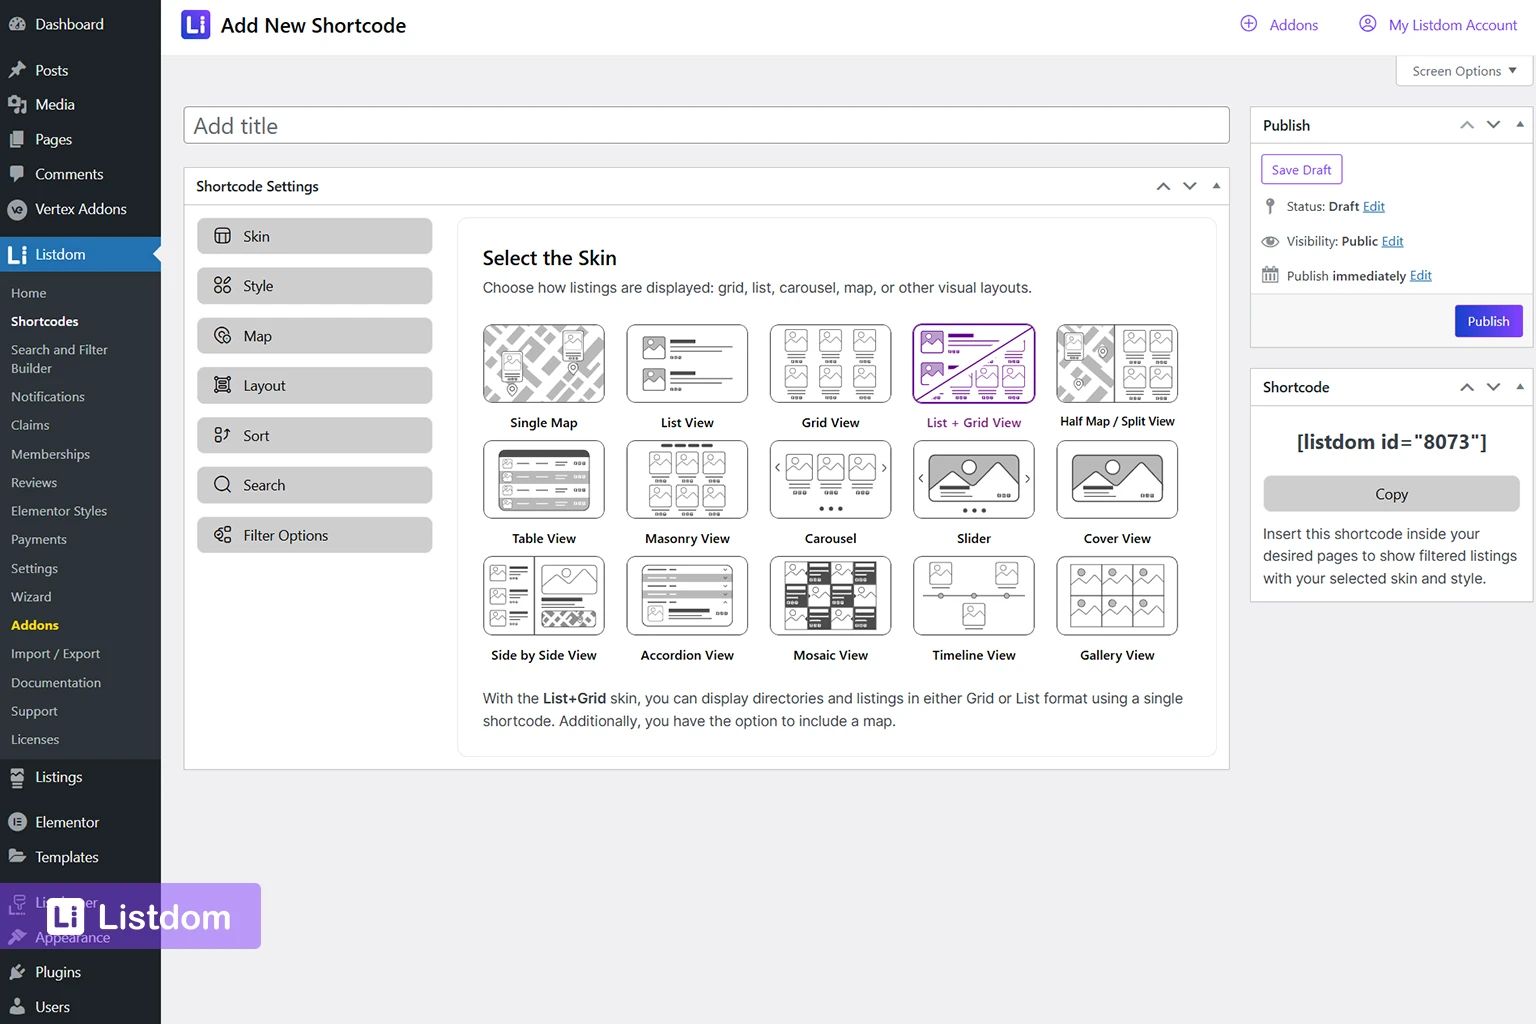
To create a listing layout:
- Go to Listdom → Shortcodes in the WordPress dashboard.
- Click Add New Shortcode.
- Choose the layout (called a skin).
Listdom includes multiple skins, such as:
- Grid
- List
- Half Map
- Table
- Masonry
- Carousel
- Slider
Each skin controls how listings appear visually.
For example, the Grid skin displays listings in card layouts, while Half Map creates a split view where listings appear on one side and a map appears on the other.
After selecting the skin, configure the layout settings such as:
- Listing card style
- Number of listings per page
- Sorting options
- Map settings (if the skin includes a map)
Once the shortcode is configured:
- Click Publish.
- Copy the generated shortcode.
- Create a new page in WordPress, such as All Listings.
- Paste the shortcode into a Shortcode block or page builder widget.
When you publish the page, your directory listings will appear on the frontend.
Step 8: Set Up Search and Filter Forms
A directory becomes much more useful when visitors can search and filter listings. Listdom includes a powerful Search and Filter Builder that lets you create custom search forms.
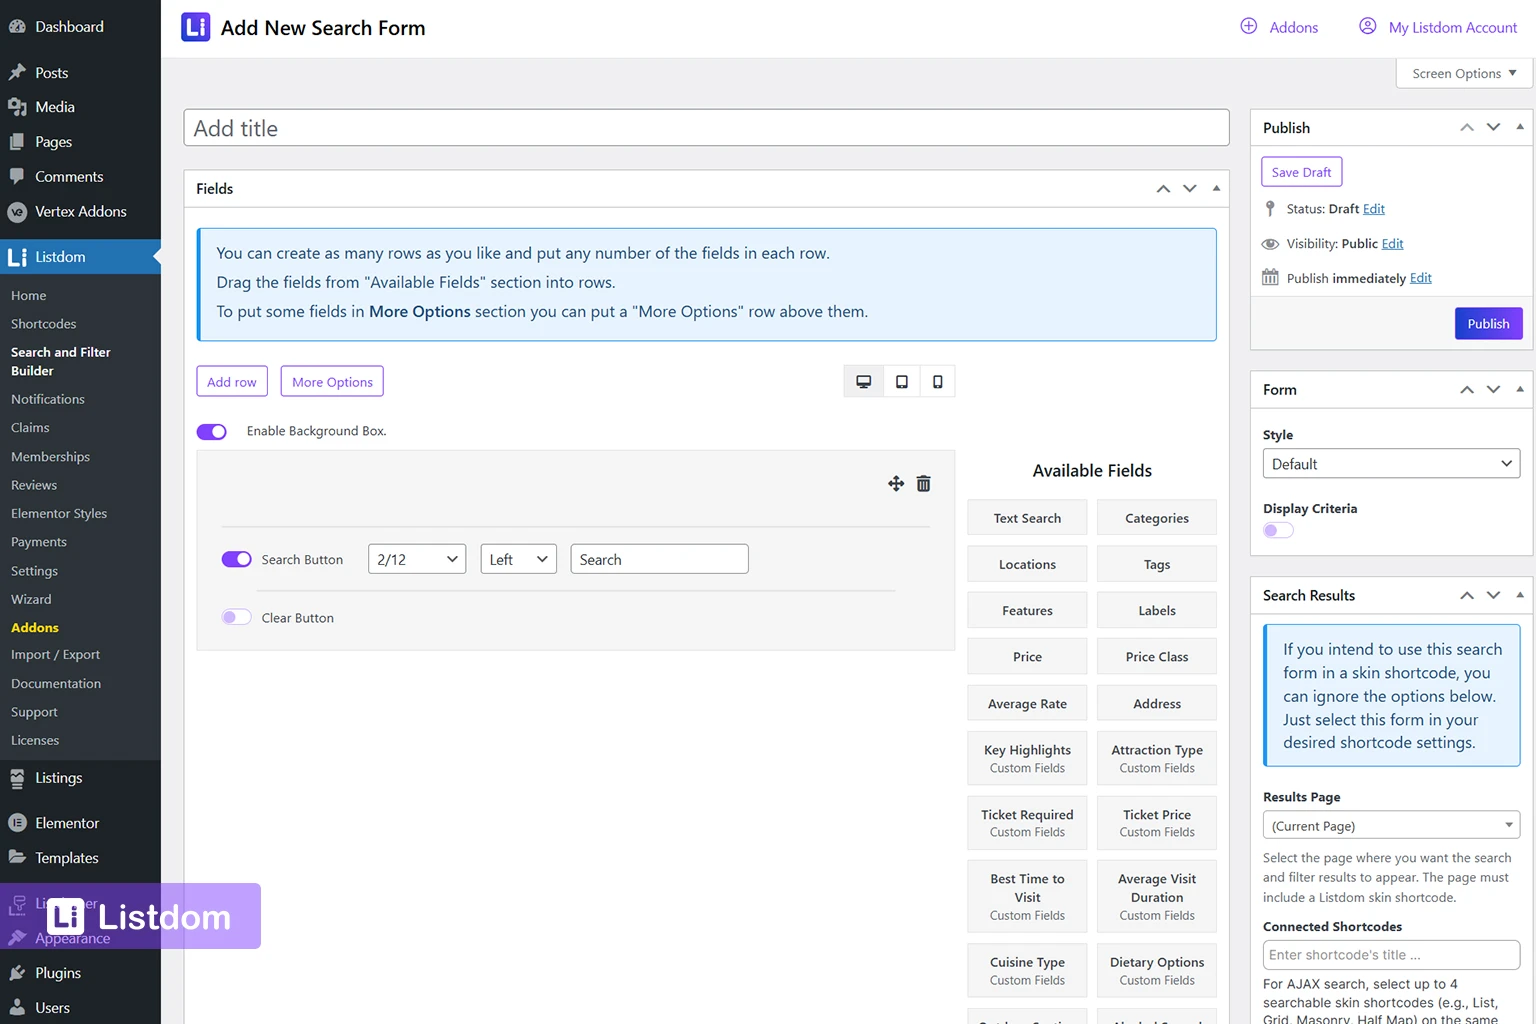
To access the builder:
- Go to Listdom → Search and Filter Builder in the WordPress dashboard.
- Click Add a New Form.
Inside the builder, you will see a drag-and-drop interface. You can add fields such as:
- Text Search
- Categories
- Locations
- Tags
- Features
- Labels
To add a field:
- Drag the desired field from the available fields panel.
- Drop it into the search form layout.
- Configure options such as label, placeholder, width, and input type.
For example, you might create a search form with:
- Category selector
- Location selector
- Text search field
You can also create multiple rows and use the More Options feature for more advanced layouts.
Once your search form is complete:
- Click Publish.
- Copy the generated shortcode.
You can place the search form:
- Above a listings shortcode on the same page
- On a dedicated Search Listings page
If you want search results to appear on a different page, open the search form settings and choose a Results Page. That page must also contain a listings shortcode so the results can be displayed.
Listdom Search forms and listing shortcodes work together. The form filters the results that appear in the listing layout.
Step 9: Set Up the Frontend Dashboard
Many directory websites allow users to submit listings themselves. Listdom includes a Frontend Dashboard that lets users manage listings without accessing the WordPress admin panel.
To enable this feature:
- Create a page and insert the [listdom-dashboard] shortcode into it.
- Go to Listdom → Settings → Frontend Dashboard → Add Listing → General → Dashboard Page.
- Select the dashboard page you’ve just created.
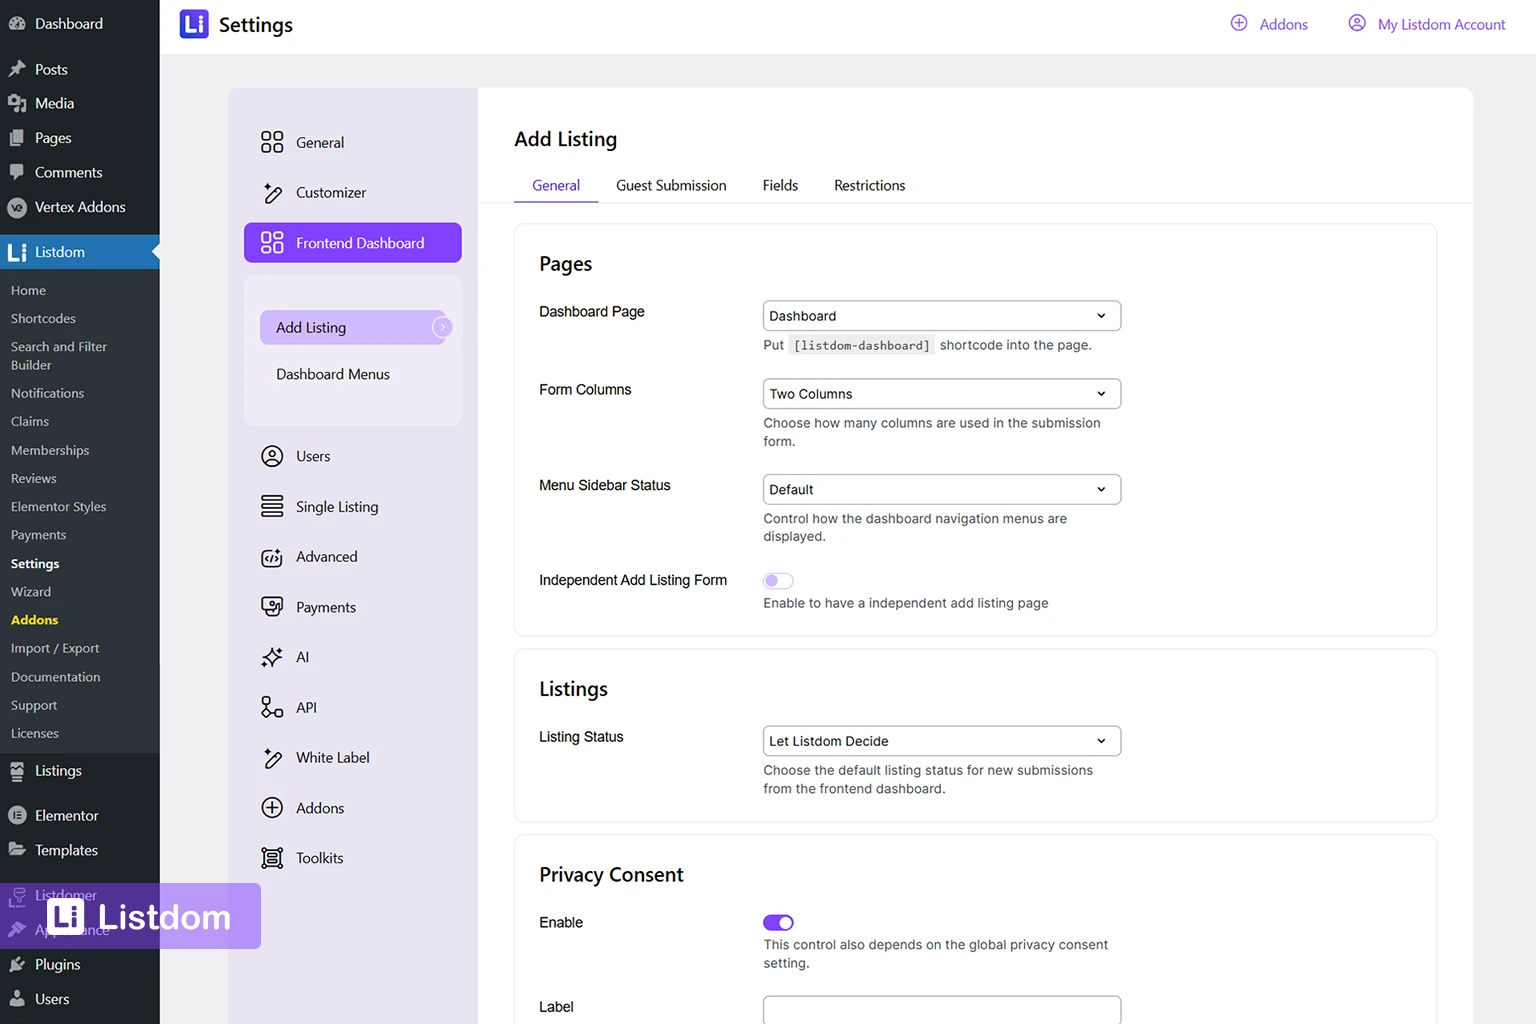
Once published, users will be able to:
- Submit new listings
- Edit their listings
- Manage listing information
You may also configure the Listing Status option so new submissions are set to Pending Review before being published. This allows administrators to approve listings and maintain quality control.
Guest Submission
If you want to enable the site users to submit listings without creating an account, then you need to activate the Guest Submission option. To do that, go to Listdom → Settings→ Frontend Dashboard → Add Listing → Guest Submission and enable it. Remember that this option is available in the Listdom Pro addon. So you need to install and activate this addon to access this feature. Learn more about the Listdom Frontend Dashboard.
Importing Listings from Existing Data
Many directory site owners already have listing data from another website, spreadsheet, or even another directory plugin. Instead of recreating every listing manually, Listdom provides several methods to import listings in bulk or migrate them from other systems.
Understanding these options can save a significant amount of time when launching a new directory or switching platforms.
CSV Import (Built‑in Import / Export Tool)
Listdom includes a built‑in Import / Export feature that allows you to import listings using CSV files. This method is commonly used when you already have structured data stored in spreadsheets or exported from another system.
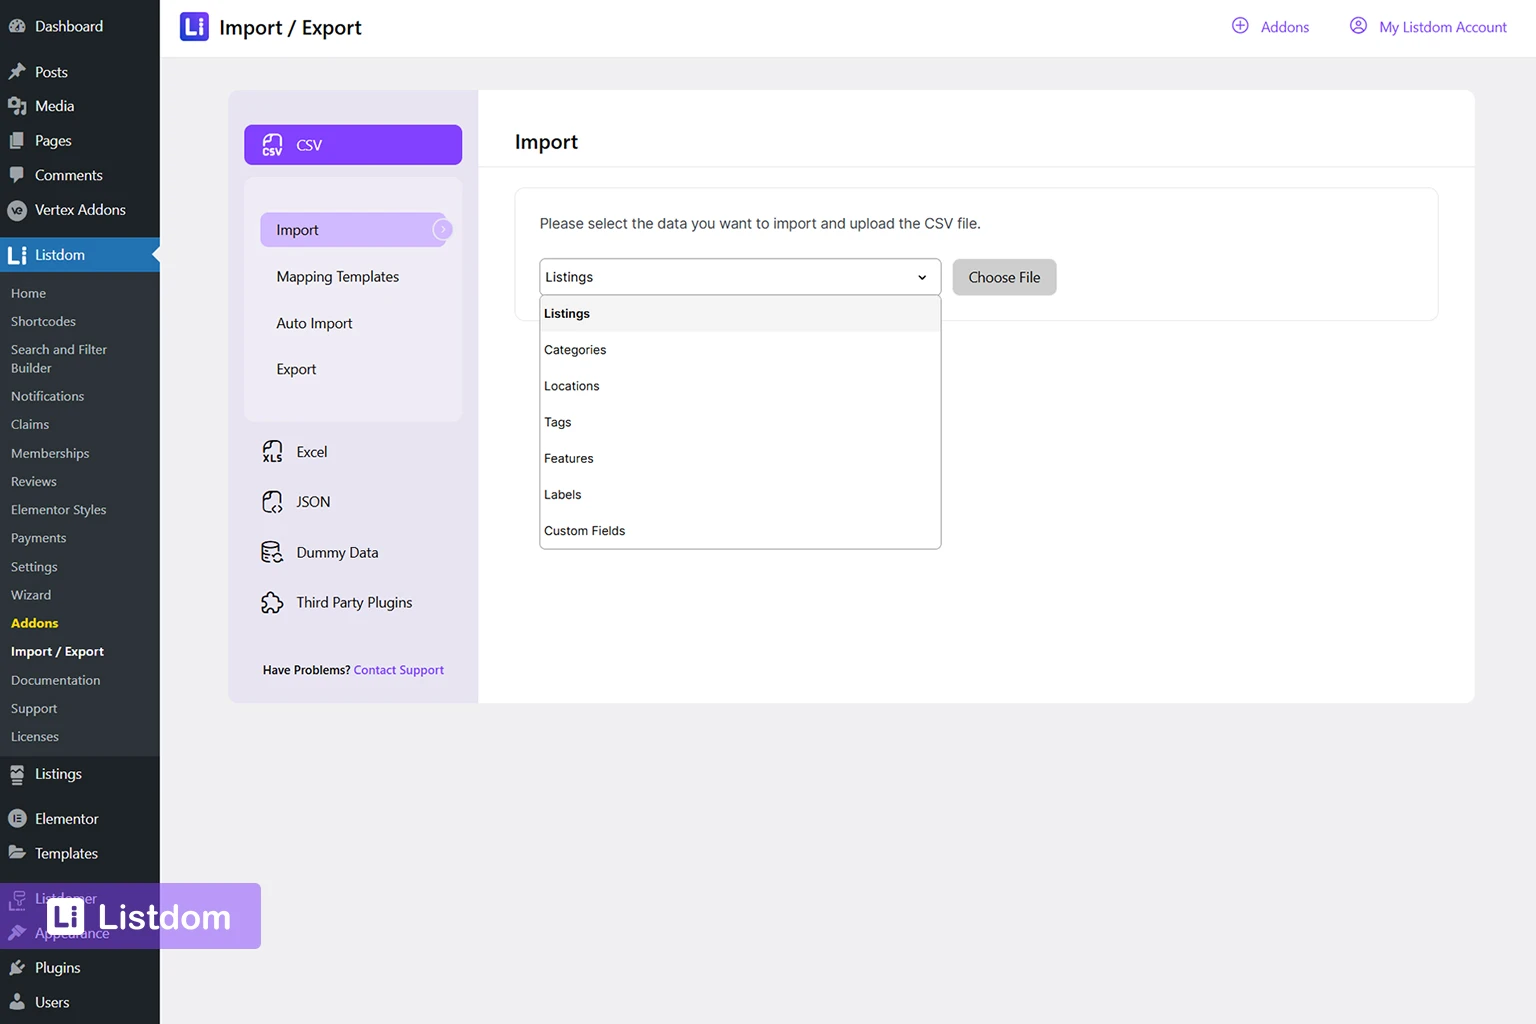
You can access the importer from:
Listdom → Import / Export → CSV
Using the CSV importer, you can import:
- Listings
- Categories
- Locations
- Tags
- Features
- Labels
A typical workflow looks like this:
- Prepare your data in CSV format.
- Make sure columns match the required fields such as title, description, address, coordinates, and taxonomy values.
- Upload the CSV file through the Import / Export interface.
- Map the CSV columns to the correct Listdom fields.
- Run the import process.
This method is ideal if you are:
- Migrating listings from spreadsheets
- Importing business data from another system
- Launching a directory with hundreds or thousands of listings
CSV import gives you full control over the data structure but requires preparing the file carefully before importing.
Excel Import (Listdom Excel Add‑on)
If you prefer working directly with Excel files, Listdom also offers an Excel Add‑on that simplifies importing listings from Microsoft Excel spreadsheets.
Instead of converting files to CSV manually, the Excel add‑on allows you to:
- Upload Excel files directly
- Map spreadsheet columns to listing fields
- Import large listing datasets efficiently
This option is useful for teams that manage listing data in Excel or receive directory data from partners in spreadsheet format.
Migrating from Other Directory Plugins (Listdom Bridge Add‑on)
Some users are already running a directory website using another WordPress directory plugin and want to switch to Listdom without losing their listings.
For this scenario, Listdom provides a free Bridge Add‑on.
The Bridge add‑on is designed to transfer listings from common directory plugins to Listdom when both systems are installed on the same WordPress website.
The migration process typically works like this:
- Install Listdom on the existing website.
- Install the Listdom Bridge add‑on.
- Go to Listdom → Import / Export → Third Party Plugins
- Detect listings created by the previous directory plugin.
- Convert and migrate those listings into Listdom format.
This allows you to move from older directory systems to Listdom while preserving:
- Listing content
- Taxonomies
- Basic metadata
Migration tools can significantly reduce the time required to rebuild a directory from scratch.
When Should You Use Each Import Method?
Choose the method based on your data source:
- CSV Import → Best for structured datasets or exported data
- Excel Add‑on → Best for teams managing listings in spreadsheets
- Bridge Add‑on → Best when migrating from another directory plugin
Using the right method ensures your directory can scale quickly without requiring manual listing creation.
Common Beginner Mistakes
- Confusing dummy data with full theme demos.
- Editing demo layouts before understanding the shortcode structure.
- Creating listings without defining categories first.
- Forgetting to publish a shortcode page.
- Over-configuring settings too early.
FAQs
Do I need the Listdomer theme to use Listdom?
No. Listdom works with almost any modern WordPress theme. The Listdomer theme is optional and mainly useful if you want ready‑made demo layouts, Elementor templates, and a predesigned directory structure. If you prefer building your own design or already have a theme, you can use Listdom without Listdomer.
What is the difference between dummy data and demo import?
Dummy data is imported directly through the Listdom plugin and usually includes sample listings, categories, and locations. It helps you understand how listings are structured.
Demo imports are performed through the Listdomer theme and usually include complete website layouts, homepage sections, listing templates, and navigation structure.
In short:
Dummy data = sample content
Demo import = full site design + content
Where can I find the Search and Filter Builder?
You can access it from your WordPress dashboard:
Listdom → Search and Filter Builder
From there you can create custom search forms, add filters such as category or location, and publish them using shortcodes.
Search forms are usually placed:
Above listing pages
On a dedicated search page
On the homepage of a directory
Why are my listings not visible on the website?
This usually happens because listings have been created but no shortcode has been added to a page.
To display listings you must:
Go to Listdom → Shortcodes
Create a shortcode with a layout (skin)
Copy the shortcode
Paste it into a WordPress page
Once the page is published, your listings will appear.
Do I need a Google Maps API key?
If you want to display maps, markers, or map‑based layouts such as Half Map, using the Google Maps, you must configure a Google Maps API key.
You can add it here:
Listdom → Settings → Maps
Without an API key, map layouts will not load correctly and you can use the Leaflet map instead.
Can users submit listings from the frontend?
Yes. Listdom includes a Frontend Dashboard that allows users to submit and manage listings without accessing the WordPress admin panel.
You can enable this feature in the settings and select the page where you have inserted on the dashboard shortcode such as:
“Submit Listing”
“User Dashboard”
You can also require moderation so submissions must be approved before appearing on the site.
Can I import listings in bulk?
Yes. Listdom provides an Import / Export feature that allows you to import listings using structured data. This is useful when migrating an existing directory or adding many listings at once.
You can access it from Listdom → Import / Export
Do I need Elementor to use Listdom?
No. Listdom works with the WordPress block editor and shortcodes. However, Elementor users can install the Listdom Elementor Add‑on, which provides visual widgets for listings, taxonomies, and search forms.
What types of websites can I build with Listdom?
Listdom can be used to build many types of directory websites, including:
Business directories
Real estate listing sites
Job boards
Event directories
Local service marketplaces
Classified ads websites
The structure of listings, taxonomies, and custom fields makes it flexible enough to support many industries.
What should I build first after installation?
After installing Listdom, focus on these steps:
Configure the map in settings
Create categories and locations
Add a few test listings
Create a listings shortcode
Publish a directory page
Once these steps are complete, you can continue adding features such as search forms, frontend submissions, or monetization tools.
What to Do Next
Now that you understand how to use Listdom and how demos and dummy data work, your next step depends on your goals.
You can also learn more about monetizing your directory site.
Final Thoughts
Start with structure. Decide whether you want dummy data or a full demo. Understand how listings and taxonomies connect. Then build step by step.
With a clear workflow, you can confidently launch and scale your directory website.